Pages

Thursday 30 August 2012

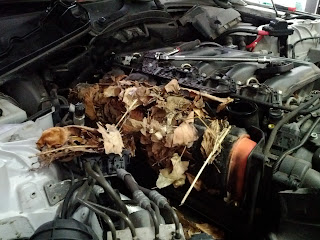
Amazing air filter blockage.

This is a BMW diesel that came in for a service, it had no complaints from the owner.
You can imagine my surprise as I went to change the air filter. It is the worse I've ever seen, totally full with leaves.
A good clear out and a new filter was all that was required.

Um, something not right here..

There appears to be a forest in your engine, Sir

Sure there's a filter under here, somewhere

There you are..

In the bin

Now that's more like it, nice n'clean

Sunday 17 April 2011

BMW E46, N42 engine, crank sensor.

The best way to change the crankshaft sensor on a N42 BMW engine is to remove the inlet manifold.
The sensor is located just under the starter motor.

With inlet manifold removed.

BMW recommend changing the two camshaft sensors at the same time, these are easy, right on the front of the cylinder head.


Tuesday 12 April 2011

Hyundai Coupe clutch slip

Just a quick post on a problem I've come across a couple of times in my workshop. The problem is with the Hyundai Coupe clutch, it suffers from slipping. This could always be lots of things like, oil contamination, worn out clutch disc, slave cylinder, pipe work, air, adjustment or master cylinder. However, I have found that this particular model suffers from the clutch master cylinder breaking internally!

The small pin on the right should be connected to the section on the left and compress and hold the spring.

The problem this creates is that the clutch will not fully release because hydraulic fluid can't flow back in to the master cylinder, this will give clutch slip. Of course, if the car has had this problem for some time, then the clutch will have suffered and may need to be replaced.

It is possible to repair the insides, as its only a pin that has worn out of its retainer. Pattern master cylinders are only about £50. We have problems getting the right cylinder before, but managed to use the insides of a new one that was almost the same, and put them into the old body. This was a very satisfactory repair.

Saturday 9 April 2011

The real plug 'n' play.


Like many people, I have a wireless network in my house. It's used for desktop PC's, laptops, mobile phones, PS3, Xbox and the Wii. It works great and I would not like to ever be without it. However, it does have a few limitations, speed and stability being the main problem areas.

I suppose I've been demanding more and more from my 'wi-fi', such as - online gaming and HD video streaming. Though wireless is OK ish for gaming, it's not great and you've got know hope of decent video streaming. 

My solution was 'HomePlug'! What brilliant technology!

I bought these Solwise Piggy MK2.

HomePlugs use your existing house electrics to shoot network computer data to every plug power point in your house! For example; I needed to make a wired connection to my PS3 in my lounge, to my computer upstairs. Normally this would be done by drilling some big hole in your walls and running lots of Ethernet cabling from one machine to another. But what I did was plug one HomePlug in to a power point next to my computer and another next to my PS3. Then using an ethernet lead i connected the HomePlug to my machines, this then creates a physical link between the two.

This is not my network, there are lots of different setups.


The results are amazing, the tech actually works. My wireless had a max of 54 mbps (you never get this) but my Homeplugs are 200 mbps (you ain't getting that either). I am getting about 130 mbps now and my videos are streaming faultlessly!

The technology standard has sorted itself out a bit so HomePlug IS the standard to the Powerline technology. You can add to your network anytime, just buy any brand of HomePlug and it should work!

They are getting faster, as always. The current speeds available are : 85 mbps (sometimes called 'turbo'), 200 mbps (sometimes called 'AV') and Gigabyte.


Useful links:      Solwise
      
                        Some FAQs

                        Wiki


Wednesday 30 March 2011

Return of the Mac..


I do love to take things apart to see how they work, of course this is difficult now days with circuit boards, chips and processors. However, this doesn't put me off, I have managed a few repairs now, using the Internet as a guide I might add.


My finest achievement (so far) has to be repairing a Macbook Pro 15" 2006.
It had the graphics problem where the ATI graphics chip loses contact to the logic board. The problem this creates is lots of square blocks covering the screen after boot-up. Mine would only boot in safe mode but the squares/blocks made using the Mac impossible.

Oh No!

Dismantling the case is quite easy, though the front edge was a bit tricky. this is clipped in place and my clips were very stubborn, I did not want to damage or bend the ally case for obvious reasons, so I used a small screwdriver to pop each one apart. No damage!


With the top section and keyboard removed, you see the daunting task ahead, but it's not too bad once you get stuck in. I took a few pictures before I started. Taking pictures is very helpful if you can't quite remember what goes where, I did refer to them a couple of times.

Basically the whole logic board has to be removed. All wires, drives, fans and more screws, these are very tiny screws too. I did try and keep them all organised and I did mostly succeed.

Logic board, ATI chip 3rd right.
With the logic board removed you need to locate the ATI graphics chip. Cleaning the heatsink compound off of all three chips will reveal the 'ATI' logo printed on one of them.


Next was a heat shield, a few layers of kitchen foil is perfect. Wrapping it around the whole board (3/4 layers) until it's completely covered. Then press the area to locate the ATI chip and cut out round the edge to reveal it.

TaDa!
Now the scary part, I needed to heat the chip so hot it would melt the solder underneath which connects it to the board. This heating process is done using a heat gun, mine had a variable temperature control and temperature gauge, very useful. I started at a low temperature and warmed the whole board, this help stops any distortion. Warming the chip in gradual and slow steps all the way up to 450 Celsius! This took me about 15 minutes in total.


IMPORTANT! The board, chip or anything else close by must not be moved for around 10 minutes or more, it needs to cool down. If the chip is touched in any way, with the solder melted, the Mac is scrap!

I used new heatsink compound on all three chips, then refitted in reverse order.

The Macbook booted perfectly and is still working, OK, only been six weeks ;-)


Thursday 17 March 2011

Who is beardyman?


Beardyman is a musician from London, a two-time beatbox champion and a genius with using music technology to sample and loop his own sounds from his mic. He creates a full DJ set doing this, with amazing effect.

You'll find plenty of beardyman on YouTube, I can watch and listen for hours.

Inventive, spontaneous and a clever git! (I hate him)

Beardy Wiki


Wednesday 16 March 2011

Kick-Ass


Okay, I know this film has been out for a while now, so don't go and see it.. go and get it!

Love this film..

Software I like..

King Chrome

I think Google Chrome internet browser is king of all browsers. I know there are many, and I have not tried them all. Most are skinned and modified versions of the 'main bunch',
Microsoft Internet Explorer, Mozilla/Firefox, Safari and Opera. More..

Chrome is fast, simple, easy to use and looks great, with lots of themes available to personalise. It is available on all major operating systems too. But one very cool feature is 'sync'! If you use Chrome on more than one computer then 'sync' is a must!
Once set-up (by using your Gmail account) you will see all the Chrome browses on all your computers will be identical all the time. All bookmarks, theme, passwords, form filling and more, all synced.

Don't worry if you don't want it all synced, you can choose what to sync!


Take a peek..Google Chrome.

Tuesday 15 March 2011

VMware Player, a PC within a PC..

I came across an interesting piece of software the other day. 'VMware player' lets you install a 'virtual machine' on to your computer. Then it enables you to install other operating systems like, Windows XP, any Linux distro, and many others. These are installed on to your new 'virtual machine' (just looks like a window on your desktop).

I found this gem whilst looking for a way to run  Windows XP IN Windows7! Microsoft only provide this luxury if you've splashed out on Win7 Ultimate, Pro or Enterprise! I have the 'Home Premium' version, Grrr.

This really is quite easy to set up and it works and it's FREE!

Check it out... VMware Player

I should mention that there was a practical reason for me wanting such a thing, I needed to run and old XP program that wouldn't work in Win7... problem solved!